Microsoft Azure Traffic Manager
Azure Traffic Manager is a sophisticated DNS-based traffic load balancer that enables its users to distribute world wide web traffic to services across all Azure regions, while providing high availability, performance and responsiveness. Traffic Manager works purely at DNS level. As a result, once Traffic Manager has performed its designated task, the user’s device can access the selected instance directly.
What’s an endpoint?
Traffic Manager uses Domain Name System to direct client requests to the service endpoint (instance of your website or application with a public DNS that Traffic Manager can direct web traffic to) based on traffic-routing method but also on endpoint’s health.
Traffic Manager provides several traffic-routing methods and endpoint monitoring options to handle different application needs and automatic failover models. Traffic Manager was developed to be resilient to failure, including the failure of an Azure region.
You can set up Azure hosted endpoints, external endpoints – hosted outside of Azure, on-premises or with another host, and nested endpoints – where you can combine multiple Traffic Manager profiles.
Note:
All your endpoints must be static pages displaying the same content to the user, or they need to access a shared database in order for Traffic Manager to work properly. Otherwise, any change that users make while using your web service at one endpoint will not be coordinated with changes that users make at another endpoint.
Choose your DNS name
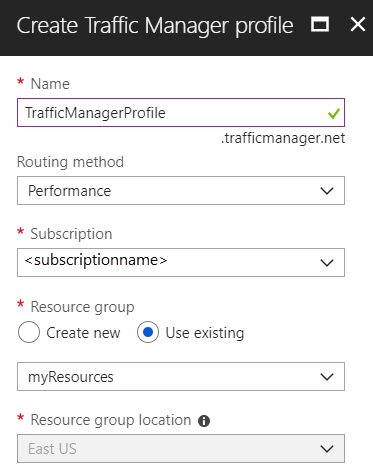
When creating a Traffic Manager profile, it’s mandatory to choose a unique name using the following format:
myexample.trafficmanager.net
This will become your DNS name when connecting to your Traffic Manager profile. Once a user’s local DNS server finds your Azure DNS server, the Azure DNS server will select an endpoint, according to the traffic-routing model you’ve chosen, to direct the user.
Note:
Before going live with Traffic Manager, it’s imperative to update your DNS records to reflect the change above.
Choose a traffic-routing method
Azure Traffic Manager allows you to choose from four traffic-routing methods. You can choose only one traffic method per profile. However, you can create multiple profiles and combine them for a sophisticated traffic routing. This is commonly known as nesting. Keep in mind that all traffic-routing methods involve endpoint health checks and automatic failover.
Priority
The priority traffic-routing will allow you to choose a preferred endpoint to direct all traffic to. If your preferred endpoint is unresponsive, Traffic Manager will direct traffic to the endpoint under the next priority level.
Weighted
The weighted method allows you to distribute traffic by creating a custom ordering of endpoints. However, by using the Weighted method Traffic Manager will distribute traffic across all healthy endpoints. The amount of traffic Azure Traffic Manager allocates to each endpoint will reflect the specific weighting you’ve assigned to each of them. If you assign all endpoints the same weight, then Traffic Manager will evenly distribute traffic across all available endpoints.
Performance
Under the performance model, Traffic Manager will find and choose the closest available endpoint, which will have the lowest latency, or distance-driven delay, hence the best performance. For example, if a given user is in North America and you have an endpoint there, this endpoint will be automatically assigned to deliver content to your user.
Geographic
Somehow like the Performance traffic-routing model, the geographic method sends users to endpoints in their own region, based on local DNS. However, the Geographic model is slightly different compared to the Performance model because it is entirely possible for the nearest endpoint to be in a different geographic region than the user, such as a few miles across a region border. In this case, the nearest endpoint would be a good solution for performance, but not an option under the geographic approach.
Directing users to endpoints in their own region has several advantages. For instance, if your organization needs to comply with several regulatory restrictions in a certain region or if it wants to customize the user experience region-based, or to track traffic by region, then the geographic traffic-routing method is the right option.
Choose DNS Time To Live (health-check frequency)
One of the most important aspects to consider when configuring your Traffic Manager profile is TTL. Known as the time-to-live (TTL) for a DNS record, in the context of Traffic Manager this value represents the time that passes between endpoint health checks. The shorter the TTL, the higher the frequency of checkups and the more effective Traffic Manager will be at routing traffic away from unresponsive endpoints.

However, it’s not always a good idea to reduce TTL to the lowest possible period. This is because the more health checks Traffic Manager performs, the higher the cost to your company under Traffic Manager’s pay-as-you-go pricing structure. So, after you experiment Traffic Manager’s benefits, you will probably want to find a satisfactory compromise between affordability and optimal traffic routing.
The Overall Process
1. The user tries to access your URL (myexample.com).
2. The user’s local DNS redirects them to an alias – myexample.trafficmanager.net, your Traffic Manager profile, which resides in Microsoft Azure cloud.
3. Traffic Manager will select an endpoint to direct the user to, based on the traffic-routing method you have chosen.
4. Traffic Manager sends the IP address for the selected endpoint back to the user’s device.
5. The user’s device connects directly to the assigned endpoint.
Let our team of cloud engineers manage Microsoft Azure for your small – medium company!
Your IT – Anytime, Anywhere!

